Showing posts with label Renovation. Show all posts

February 25, 2011

Installation of DC Heater

The plumber came this afternoon and successfully installed the brand new DC Heater by Seers. As he entered the door he was asking me whether it's Joven or Alpha. Then his eyes set upon the huge box..... he was really surprised. He said he has never installed a DC Heater before. Anyway he checked the manual and said OK no prob - it's similar to the other storage tank water heaters. 

He took about 2 hours to complete the installation. Had to drill holes on the wall in the plaster ceiling to support the water heater. The heater took about an hour to heat up the water. So far so good! Nice hot water in the shower, bathtub and mixers in the master bathroom.

February 20, 2011

DC-Heater

I mentioned in one of my earlier posts that I bought 2 Stiebel Eltron instant water heaters. I passed them to my ID and instructed the electrician to ensure that the wiring is changed accordingly to enable the water heaters to work. However, the electrician did not change the wiring...... although he claimed he did. After the plumber installed the water heaters, one of them couldn't work. Then I called the condo management to take a look instead. They sent 2 electricians and after checking they said that the wiring has not been changed to support the water heaters. In order to change the wiring, the existing 4mm wire needs to be removed and replaced with 6mm and 10mm wires respectively. Even the amperage is not enough. The maximum amperage is 20Amp but the water heaters need 32Amp and 45Amp. Unfortunately, all this changes would require hacking and a lot of work. 

The condo management facilities manager came over to have a look too and she suggested that I purchase the storage tank water heaters as the bathrooms are designed for storage water heaters. She also mentioned that there were 2 cases whereby the owners also installed Stiebel Eltron water heaters without changing the wiring (they were also conned by their electricians!) and what happened was the wires connecting the water heaters melted and power supply tripped.

I've requested for a compensation from my ID because of her electrician's fault. My ID apologized and said she will send me another new electrician to check on all other wiring. I've since ordered another water heater from Bathroom Gallery Seapark PJ - just one unit for the master bathroom to try out first : Creation DC-Heater - horizontal type 40L for RM1500. The DC-heater is a storage tank water heater but consumes very low amounts of electricity. For complete info do check out their website : dc-heater.com


February 18, 2011

Kitchen Installation Part 7

Purchased the following items from Ikea and arranged for Hello Handyman to come install them.

1) Rationell Pull-out Waste Sorting Tray RM85


2) Rationell Compost Bin RM39


3) Rationell Waste Sorting Bin RM39 each

4) Rationell Variera Waste Bin RM12.90


I also purchased a mixer from Ikea as I felt the complimentary mixer from the developer is too tall for the peninsular. This mixer costs RM49.


Here's how the Rationell waste sorting tray and bins look like install inside the cabinet beside the double bowl sink. The Rationell Variera white basket fits inside too.


This is the other Rationell bin installed on the door of the cabinet below the round sink with the Ikea mixer.

February 07, 2011

Curtains and Blinds

My ID gave me 2 contacts for the curtains/blinds. The first one I contacted was Mr Chai of Asia Wallpaper in Cheras. We met up and he showed me samples of the curtains and did the site measurement. The other lady I contacted was Mrs Ang but the price quotation she gave me was out of my budget. She was very persuasive and pushy... and I didn't like that one bit. So, I decided on Asia Wallpaper and total was RM3500 after discount. Mr Chai was very professional and very precise and reliable.

Bamboo blinds for the yard - more for privacy - no need to shield from rain or shine. So I chose the cheapest one available.

Roller blinds - silver grey. Black-out material and easy-care.

Same roller blinds as above here. Black-out blinds means that no light can pass through.

Black-out curtains with single aluminium track and french pleats plus curtain tie-backs. So not in love with the curtain tie-backs as they are very antique looking and bronze in color with a rose motive. 

The living room curtains go up all the way to the ceiling and the curtain tracks and pleats are hidden by the pelmet of the plaster ceiling giving it a clean minimalist look. Be prepared to pay more for this! There are 2 curtain layers, one is solid silver with wavy lines and the other is sheer white. Double aluminium tracks used here and curtain tie-backs. Length of the curtains are slightly shorter so that it will not be 'sweeping' the floor.

Approx cost breakdown :
Bamboo blinds: RM150
Blinds in rooms : RM250 each - RM500 total
Master Bedroom : RM850
Living Room : RM2000

February 06, 2011

Kids Bedroom

Initial stage of the installation procedure for the children's bedroom.

Lots of spray paint used here - hence the newspapers. Even then my solid timber flooring is covered with fine drops of white paint. 5 layers of spray paint done in 2 separate times. Here are the finished results..... lots of mistakes here and there which will only be rectified after the Chinese New Year break.

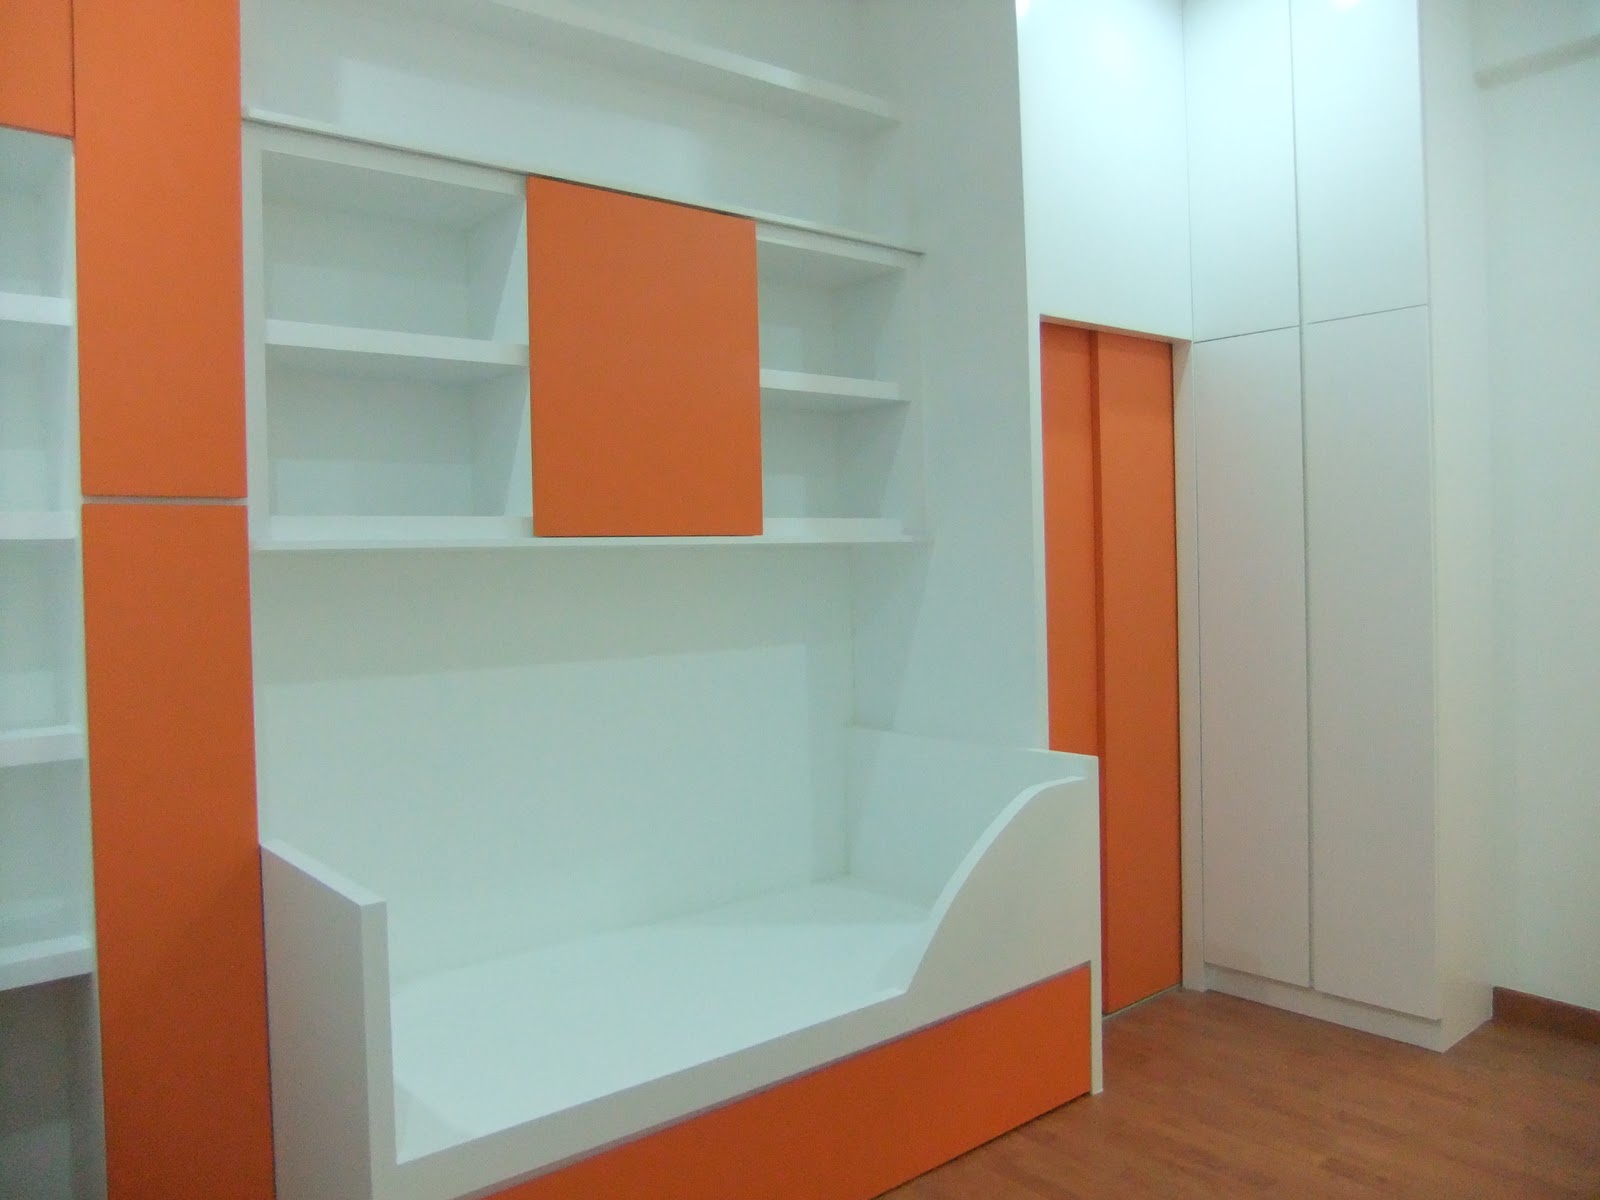
Window bench with 3 drawers. My ID initially set the depth of the bench as 60cm. I commented that it was too deep and requested it to be shortened to 40cm but seems like the correction did not get through to the carpenters. The bench was completed with a depth of 60cm much to my dismay.  However, this mistake was easily rectified and was done within a few hours. Even then, the depth of the bench is now 44cm. Well, at least we can now easily open and close the window above it.

Another mistake here is the cabinet on the upper right corner in the photo above. It's supposed to be open shelves but there are orange swing doors placed there. I've requested that the doors be removed but my ID says it's better with the doors. So, I've decided to accept the doors but the color has to be white instead of orange.

More mistakes here.... the walk-in wardrobe with the orange doors..... was wrongly done. Right now, I cannot walk into the wardrobe because of insufficient depth. The depth of the wardrobe is supposed to be 100cm (same as the width of the bed) but now it's only 65cm. It's only functioning as a sliding wardrobe now. Can't access the right side of the wardrobe easily. Another mistake here was the sliding doors. It's just supposed to be a single sliding door instead of 2 sliding doors as photographed. As for the cupboard beside the wardrobe, it's only supposed to have 2 doors - and not 4 doors as photographed. I've also requested my ID to change the depth of the cabinet to 40cm instead of 35cm. Somehow the dimensions were all wrongly done and I had to ask the carpenters to remove the semi-circular display shelves on the right of the cupboard as they extend too near the door.

Another mistake that I would like to highlight here is the orange sliding door above the single bed. It was wrongly done as a swing door. Actually it's supposed to be open shelving and a single sliding door. I have to also mention that the orange doors on the left of the bed are also wrongly installed. Instead of opening to the right, it opens to the left - most inconvenient.

This is the pull-out bed with castors. Can be placed anywhere in the room. I hope the rectification process will not take too much time and can be done by end of February.

January 30, 2011

Console

Initially the console was placed in the wrong position. Got the carpenters to move it higher so no stooping when opening the drawers. The console was also shifted nearer to the main entrance so it will be a good landing area for placing items when back home or to place items there that we need to bring out.

It has 6 drawers and a magnetic board for notices. Drawers can store letters/bills, stationery, keys etc. Very convenient indeed.

January 27, 2011

Living Room

Step-by-step pics of the living room cabinetry and feature wall being constructed. Spray paint finish and Formica laminates for the doors. Drawers are at the bottom. 3 LED eyeball lights to illuminate the cabinetry.


After fitting the doors, they are then removed for spray painting hence the newspapers.


After spray-painting, the final touch-ups.


Completed TV cabinet, display shelf and feature partition wall. Unfortunately, there are a few mistakes here. The feature wall's position is incorrect and because of that, the feature wall can't be fully seen and the partition wall is also too short. Some of the handle-less doors are difficult to open. Have to wait until after Chinese New Year for the rectifications.

January 26, 2011

Kitchen Installation Part 6

One week after the measurements were taken, the kitchen backsplash was installed. Very professionally done by GlassKote.  The color I chose was Lightbox Grey. It's 6mm clear tempered glass with 10 year warranty. Panel above for the hob and another panel below for the sink.

Cost per square foot is RM50. Additional charges for flat edge polish at RM5 per foot run. Power point cut outs and corner cut outs are also charged. Total bill for my backsplash : RM2105. Loving the backsplash very much! Kitchen is almost complete! Oh, forgot to mentioned that the Orion mixer complimentary from the developer has been installed by the plumber..... who also installed my dishwasher and did the plumbing for the sinks.

January 25, 2011

Bathrooms


Master Bathroom - mirrors and shelving in place. Cabinetry below sink to hide unsightly pipes and also for storage. All cabinets are Formica laminates with aluminium frame.

 Powder Room

Ensuite Bathroom

January 24, 2011

Walk-in Wardrobes by Fiorenza


Purchased my wardrobes from Fiorenza during Homedec 2010. Price for an 8-ft wardrobe is RM3999. The 6-ft one costs RM2999 inclusive of delivery and installation. Bought 2 of the 8-ft package for a total of 16-ft length of wardrobe system. 12-ft allocated for my walk-in wardrobe (8ft by 4ft) and the balance 4ft is for the children's walk-in wardrobe.
Pic above shows the construction of the pelmet for the wardrobe. The interior walls must be painted prior to the installation of the wardrobe. The pelmet costs RM850.

We upgraded to solid silver glass doors at RM499 per door. Otherwise, the basic package includes doors with wood grain design which didn't really match our overall decor. The sliding doors for the entrance of the wardrobe is frosted glass with black glass accent - RM199 per door. The solid silver glass doors blocks shadows from the inside from being seen from the outside. If frosted glass, dark shadows of the clothing and items inside the wardrobe can be seen when the lights are switched on. Height of the doors are about 8-ft. If 9-ft doors needed, additional charges apply.

The very spacious interior of the walk-in wardrobe. The shelves and drawers are all in black glass. Both sets of drawers have locks. Lifetime warranty on the aluminium post system. Can be easily adjusted and removed if moving to another home or another room or to change the configuration.


This is the built-in cabinetry in the children's room inclusive of the wardrobe. Designed by my ID but the internals of the walk-in wardrobe supplied by Fiorenza. Numerous mistakes in the design. Redo can only be done after Chinese New Year. One of the mistakes involves the walk-in wardrobe. The depth is only 2 feet when it's supposed to be 3 feet. So, I can't walk into the wardrobe at all!

January 23, 2011

Yard


This is the 7-ft countertop at the yard which I intend to use for ironing and cooking. 9 drawers with aluminium frame and laminates plus Blum soft close mechanism for storage.
 
White solid surface countertop  - local brand. RM160 per foot run. 3 plug points on wall added. Will install bamboo blinds here for privacy. Although the yard opens to the outside, the rain doesn't splatter inside and it's very shady here - no sun rays at all. Not a good place to dry clothes! Balcony is still the best but the condo management says no laundry on the balcony!

January 21, 2011

Kitchen Installation Part 6

Plaster box up completed for the cooker hood

Definitely look much neater this way - in the yard.
Glasskote has taken the measurements for the kitchen backsplash & installation already scheduled in a few days time.

January 18, 2011

Pendant Lamps

Decided on Verner Panton's Flowerpot Pendant Lamp for the kitchen peninsula. However, buying original is toooooo expensive so it was certainly out of the question. However, I found a replica of the original at Spark Lighting shop at Damansara Uptown - definitely the place to go if you are hunting for lights! Over 10 shops there! I wanted the pendant lamp to be metallic silver. So, the sales guy there spray painted the lamps which were originally glossy white. Cost? RM215 each inclusive of an energy saving bulb.


Does it look small?

January 15, 2011

Kitchen Installation Part 5


Most of the kitchen installed  - within one day. Only 1 handle left to install on the cabinet above the fridge. I checked everything and discovered the lift up door to conceal the microwave oven wasn't very smooth. All the other soft close mechanisms were working perfectly. The soft close drawers are from Grass (USA) while the other cabinet hinges are Clip from Blum (Germany). I also noticed that the plinth for the kitchen was white and not aluminium silver as chosen. Plus, the aluminium foils for the sink area were not placed as well. Kuchenmatic was informed and they will return to rectify the mistakes the following week. Nevertheless, am loving the look of the kitchen!

January 13, 2011

Kitchen Installation Part 4

 Cooker hood installation : took 4 trips!

Trip#1 : No one around to instruct where to put the cooker hood due to a miscommunication with my kitchen designer
Trip#2 : Came late for the installation and thus was not allowed to drill or hack as it was already 3pm
Trip#3 : Finally installed the cooker hood
Trip#4 : Adjustment needed as the cooker hood was not level.

First up : the measurements

 23 inches from the granite top. Size of duct approx 6 inches. Wall hacked. Brackets placed.

 Cooker Hood hooked in place. Box up with plaster will be done soon to hide unsightly duct. Blue sticker tape still in place.

Had to pay RM100 for additional ducting as the package I bought was for 8ft of ducting only.
Round hole beside duct is for the downlight.

January 12, 2011

Elevation Drawings of the Bathrooms


Here are some of the elevation drawings for the bathroom cabinets. Pic above shows the one for the master bath. Unfortunately, can't proceed with the sliding mirror door as the depth of the cabinet would be too thick. I only want the depth of the cabinet to be 80mm and not over 100mm. So, both the mirrors will be fixed.

The following 2 drawings for the powder room and ensuite bathroom were not given to the carpenters and hence were not done. So, it's been recently submitted and it's now under construction. Again, the mirrors are fixed to the cabinet and not sliding as drawn. 

Lesson #1 : Make sure the carpenters received and understood all the elevation drawings. Go through with them step by step and all the details e.g. dimensions, colours and finishings.